Spring Security 的原理与探索
简介
本文基于Spring Security 5.5.3版本,文章信息参考SpringSecurity官方文档与博主自身的理解与应用的结合,探索SpringSecurity原理思想 。
本文主要讲解了SpringSecurity的实现思想,原理以及博主个人的一些见解,目的就是让大家对于Spring Security有一定的理解,以便未来更好的在实际当中去运用。
Spring Security的设计
SpringSecurity的整个设计思想大概是有一个顶级的管理器接口,给予一个特定的实现,由这个实现管理着多个实际操作,带着这个想法去看SpringSecurity的架构与源码,你会非常容易得理解。
Spring Security实现基于Servlet的Filter,所以要了解Spring Security 首先我们需要了解一下Servlet的Filter处理方式以及Spring如何做集成的,首先我们看一下一个HTTP处理的典型分层
什么是过滤器?
客户端向服务应用发送一个请求,容器会创建一个FilterChain(也就是过滤器链)包含了各个Filter,经过各个Filter以后,Servlet根据请求 URI 的路径处理HttpServletRequest并返回HttpServletResponse

在Spring Mvc中 一个DispatcherServlet最多可以处理一个HttpServletRequest与一个HttpServletResponse,但是可以经过多个Filter,而Filter不仅可以阻止后续的调用,也可以修改后续使用的HttpServletRequest与HttpServletResponse。大白话的理解就是,用户的请求到你写的Controller之前,有多个过滤器可以对你的请求数据进行篡改或者校验。
Spring整合Filter
在Servlet中,它允许使用自己的注册标准在交互过程中加入Filter,例如实现javax.servlet.Filter的方式,代码如下
public class TestFilter implements Filter {
    @Override
    public void init(FilterConfig filterConfig) throws ServletException {
        Filter.super.init(filterConfig);
    }
    @Override
    public void doFilter(ServletRequest servletRequest, ServletResponse servletResponse, FilterChain filterChain) throws IOException, ServletException {
        filterChain.doFilter(servletRequest,servletResponse);
    }
    @Override
    public void destroy() {
        Filter.super.destroy();
    }
}
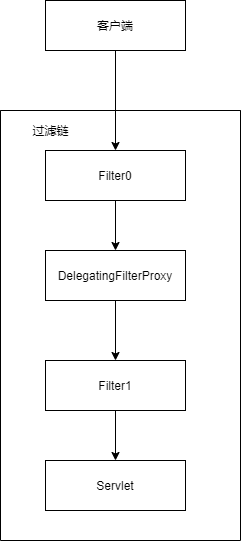
但是它并不知道由Spring定义的Bean的方式,于是Spring根据Servelt的注册机制,提供了 DelegatingFilterProxy类,它可以将过滤工作委托给Servlet的过滤器,伪代码如下
public void doFilter(ServletRequest request, ServletResponse response, FilterChain chain) {
    // Lazily get Filter that was registered as a Spring Bean
    // For the example in DelegatingFilterProxy delegate is an instance of Bean Filter0
    Filter delegate = getFilterBean(someBeanName);
    // delegate work to the Spring Bean
    delegate.doFilter(request, response);
}
由此,原本的Servlet过滤链变为了

Spring Security的核心-SecurityFilterChain
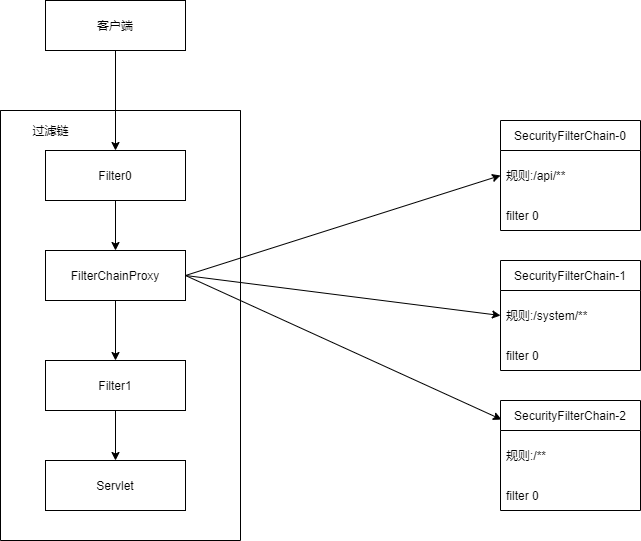
在SpringSecurity中,FilterChainProxy代替了Spring原本的DelegatingFilterProxy它可以让你定义多个SecurityFilterChain,根据你指定的规则,来选择执行哪个过滤器链,当然,它的存在,也方便我们开发人员调试,当然,如果根据你的匹配规则,匹配到多个SecurityFilterChain,他只会调用第一个

Spring Security本身的SecurityFilterChain根据排序的所有过滤器列表如下显示,方便大家以后根据自己的业务规则定义到某过滤器的前后,甚至替换。数据来源于官方文档。
- ChannelProcessingFilter
- WebAsyncManagerIntegrationFilter
- SecurityContextPersistenceFilter
- HeaderWriterFilter
- CorsFilter
- CsrfFilter
- LogoutFilter
- OAuth2AuthorizationRequestRedirectFilter
- Saml2WebSsoAuthenticationRequestFilter
- X509AuthenticationFilter
- AbstractPreAuthenticatedProcessingFilter
- CasAuthenticationFilter
- OAuth2LoginAuthenticationFilter
- Saml2WebSsoAuthenticationFilter
- UsernamePasswordAuthenticationFilter
- OpenIDAuthenticationFilter
- DefaultLoginPageGeneratingFilter
- DefaultLogoutPageGeneratingFilter
- ConcurrentSessionFilter
- DigestAuthenticationFilter
- BearerTokenAuthenticationFilter
- BasicAuthenticationFilter
- RequestCacheAwareFilter
- SecurityContextHolderAwareRequestFilter
- JaasApiIntegrationFilter
- RememberMeAuthenticationFilter
- AnonymousAuthenticationFilter
- OAuth2AuthorizationCodeGrantFilter
- SessionManagementFilter
- ExceptionTranslationFilter
- FilterSecurityInterceptor
- SwitchUserFilter
认证与授权
大白话理解认证与授权
-
认证: 告诉我你是谁。认证的过程就是解决,你是谁的问题
-
授权: 告诉你,你来我这里只能干什么。授权的过程就是解决,你能做什么的问题
认证
Spring Security默认支持的认证机制有很多,包括以下几种方式(数据来源于官方文档)
- 用户名和密码- 如何使用用户名/密码进行身份验证
- OAuth 2.0 登录- 使用 OpenID Connect 和非标准 OAuth 2.0 登录(QQ快捷登录等)的 OAuth 2.0 登录
- SAML 2.0 登录- SAML 2.0 登录
- 中央认证服务器 (CAS) - 中央认证服务器 (CAS) 支持
- 记住我- 如何记住用户过去的会话过期
- JAAS 身份验证- 使用 JAAS 进行身份验证
- OpenID - OpenID 身份验证
- 预身份验证方案- 使用外部机制(既你自己的原本方式)进行身份验证,但仍使用 Spring Security 进行授权和防止常见漏洞利用。
- X509 认证- X509 认证
知道了SpringSecurity的认证机制,如何去使用以及配置,这就需要去了解Spring Security 架构的组件,而Spring Security的架构组件,则主要包括了以下组件:
- AuthenticationManager -认证管理器:定义Spring Security的各种身份认证如何去执行验证的顶层接口
- ProviderManager - 认证提供方管理器:提供认证的所有提供方的管理器,它是AuthenticationManager的实现,
- AuthenticationProvider - 用于ProviderManager被管理的具体认证方式,典型的为
DaoAuthenticationProvider,既用户名密码模式 - AbstractAuthenticationProcessingFilter - 身份验证的基础流程过滤器。他是一个抽象方法,保证身份验证流程以及各个部分如何高效的协同工作,最典型的抽象实现类为
UsernamePasswordAuthenticationFilter - AuthenticationEntryPoint - 认证入口点: 常用于在认证成功或者失败时定义相应状态与头信息(例如认证失败重定向页面,认证失败返回401代码等)
- Authentication - 认证信息: 已通过认证的认证信息以及凭证信息,通常存放的是用户名权限等常用信息
- GrantedAuthority - 授予权限: 授予主体Authentication所携带的认证信息相应的权限,可以理解为你有个User实体类,这个实体类包含了一个List
的数据,User就是Authentication,List 就是GrantedAuthority - [SecurityContextHolder](#SecurityContextHolder 安全上下文的持有类) - 安全上下文的持有类:Spring Security 存储身份验证信息的地方,既存放的SecurityContextHolder的相关信息。
- SecurityContext - 安全上下文:可以从当前经过身份验证的用户中获取用户的Authentication信息。
现在我们开始根据SpringSecurity的认证流程看看上面的架构组件是如何整合在一起的
Authentication认证信息
认证信息,为SpringSecurity在认证中的基础接口,也是核心接口,它定义了认证信息所需要的信息,源码如下:
public interface Authentication extends Principal, Serializable {

	Collection<? extends GrantedAuthority> getAuthorities();

	Object getCredentials();

	Object getDetails();

	Object getPrincipal();

	boolean isAuthenticated();

void setAuthenticated(boolean isAuthenticated) throws IllegalArgumentException;- getPrincipal():举例在用户名密码模式当中,指用户名信息
- getCredentials():举例在用户名密码模式当中,指密码信息
- getDetails(); 举例在用户名密码模式当中,指
UserDetails,它包含了用户的一些基本信息,类似于我们平常对应user表的类 - getAuthorities();当前认证用户的权限集合
- isAuthenticated();是否认证成功
它在SpringSecurity认证流转过程当中存在两种状态:
- 用户输入的凭证信息,由AuthenticationManager管理期间,此时
isAuthenticated()为false - 已经经过身份认证的用户信息,它存在于SecurityContext,此时
isAuthenticated()应为true
GrantedAuthority拥有的权限
根据SpringSecurity官方定义:
GrantedAuthoritys can be obtained from the Authentication.getAuthorities() method. This method provides a Collection of GrantedAuthority objects. A GrantedAuthority is, not surprisingly, an authority that is granted to the principal. Such authorities are usually “roles”, such as ROLE_ADMINISTRATOR or ROLE_HR_SUPERVISOR. These roles are later on configured for web authorization, method authorization and domain object authorization.
通俗点说,就是根据业务系统需求,来定义用户权限或者角色的地方,它可以通过Authentication中的getAuthorities()来获取
SecurityContextHolder 安全上下文的持有类
它是SpringSecurity中核心,是存储着已认证用户详细信息的地方,在SpringSecurity认证过程当中,它并不关心SecurityContextHolder中的用户信息数据是如何产生的,只要把相应认证信息填充,SpringSecurity就认为它是经过认证的用户
举例说明,如果我们使用自己原本的授权模型,而不去添加过滤链,我们可以这样做:
SecurityContext context = SecurityContextHolder.createEmptyContext();
Authentication authentication = new UsernamePasswordAuthenticationToken("admin","password123456",authorities);
SecurityContextHolder.setContext(context);
这样,我们就得到了一个已认证的用户信息,如果我们在实际业务当中获取当前用户信息,我们就可以这样做:
SecurityContext context = SecurityContextHolder.getContext();
Authentication authentication = context.getAuthentication();
Object principal = authentication.getPrincipal(); //登录认证的用户名
Collection<? extends GrantedAuthority> authorities = authentication.getAuthorities();//权限集合
这样就可以随时在我们的业务中获取定义的用户信息
SecurityContext安全上下文
它是SpringSecurity的一个顶层接口,比较像我们平时使用的实体类,作用就是得到,或者加入一个认证信息,源码如下:
public interface SecurityContext extends Serializable {
	Authentication getAuthentication();
	void setAuthentication(Authentication authentication);
}存入到SecurityContext中的Authentication为认证成功数据。
上面四个是SpringSecurity基础核心,他们存在与整个认证授权期间的各个节点,现在,我们正式的去认知一下SpringSecurity的认证是如何做的,首先我们去看一下整个流程涉及到的一个关键AuthenticationManager
AuthenticationManager认证管理器
引用SpringSecurity官方文档的解释是
AuthenticationManager is the API that defines how Spring Security’s Filters perform authentication.
意思就是,认证管理器是SpringSecurity如何去执行身份认证的Api 。AuthenticationManager的源码如下:
public interface AuthenticationManager {
	Authentication authenticate(Authentication authentication)
			throws AuthenticationException;
}
AuthenticationManager属于顶层接口,它提供一个接口方法,用于身份校验,并返回一个校验后的认证信息,至于校验的规则,他留给了子类去实现,在Spring给予的实现中我们经常接触的就是ProviderManager
ProviderManager认证提供方统一管理器
同样引用官网解释
ProviderManager delegates to a List of AuthenticationProviders. Each AuthenticationProvider has an opportunity to indicate that authentication should be successful, fail, or indicate it cannot make a decision and allow a downstream AuthenticationProvider to decide.
可以解释为:认证提供方同一管理器管理着多个AuthenticationProvider(具体认证提供方),每个Provider都可以表明他是认证成功,失败,或者它无法确定是否验证成功,交给其他AuthenticationProvider处理,老常例,看源码,源码是最好的老师。
public class ProviderManager implements AuthenticationManager, MessageSourceAware, InitializingBean {
	@Override
	public Authentication authenticate(Authentication authentication) throws AuthenticationException {
        Class<? extends Authentication> toTest = authentication.getClass();
        Authentication result = null;
		......
         /** 循环遍历所有管理的provider */
		for (AuthenticationProvider provider : getProviders()) {
			if (!provider.supports(toTest)) {
				continue;
			}
			try {
                 /** 尝试去认证 */
				result = provider.authenticate(authentication);
				if (result != null) {
					copyDetails(authentication, result);
					break;
				}
			}
			catch (AccountStatusException | InternalAuthenticationServiceException ex) {
				prepareException(ex, authentication);
				throw ex;
			}
			catch (AuthenticationException ex) {
				lastException = ex;
			}
		}
		if (result != null) {
			if (this.eraseCredentialsAfterAuthentication && (result instanceof CredentialsContainer)) {
                 /** 清除敏感信息 */
				((CredentialsContainer) result).eraseCredentials();
			}
			.....
			return result;
		}
		.....
		throw lastException;
	}
}这里只保留了核心方法authenticate(),由源码可以知道他做了以下步骤:
- 循环遍历所有管理的Provider,并且判定当前Provier是否支持当前类型的
Authentication的认证 - 如果当前Provider支持该类型,则尝试去认证
- 如果抛出
AccountStatusException账户状态异常或InternalAuthenticationServiceException服务器内部异常,则直接抛出异常,认证失败 - 如果抛出
AuthenticationException,则记录当前异常继续循环,看看是否有其他provider支持其认证 - 如果正常返回
Authentication,则认证成功,清除掉Authentication当中的credentials信息,因为它通常是我们的密码,然后返回给认证流程引擎(下文会说)
由上文中,我们有引申出来两个概念,既provider跟认证流程引擎,接下来一起看下AuthenticationProvider
AuthenticationProvider认证提供方
认证提供方就是身份验证的具体操作,它依旧是有一个顶层接口,由子类去实现,源码如下:
public interface AuthenticationProvider {

	Authentication authenticate(Authentication authentication) throws AuthenticationException;

	boolean supports(Class<?> authentication);
}
它一共定义了两个接口方法,一个是authenticate的认证接口方法,一个是support可支持的类型的判定方法,在authenticate方法中,你会发现传入与返回都是Authentication,他们最大的区别是传入参数的authentication是未认证的,它的isAuthenticated()是false,而返回的Authentication则是已认证的,isAuthenticated()返回为true。
SpringSecurity对AuthenticationProvider的实现很多,比较常见实现类为DaoAuthenticationProvider 既用户名密码认证,以及JwtAuthenticationProvider JWT令牌验证。
AuthenticationEntryPoint认证入口点
它在SpringSecurity的官方文档中,是这样描述的
Sometimes a client will proactively include credentials such as a username/password to request a resource. In these cases, Spring Security does not need to provide an HTTP response that requests credentials from the client since they are already included.In other cases, a client will make an unauthenticated request to a resource that they are not authorized to access. In this case, an implementation of
AuthenticationEntryPointis used to request credentials from the client.
大致的意思就是,如果请求携带了凭证信息(既用户名密码或者token) SpringSecurity不需要去提供对应请求的响应。但是在其他越权访问时,会通过实现AuthenticationEntryPoint的方式,来重定向等响应.
大家看了官网的解释,有没有觉得他确实是入口,但是不是很抽象呢,其实我更想说它是越权访问的处理类,这样是不是更形象呢?
他的源码只有一个接口定义方法
public interface AuthenticationEntryPoint {
	void commence(HttpServletRequest request, HttpServletResponse response, AuthenticationException authException)
			throws IOException, ServletException;
}
由子类去实现越权访问后的信息。
这样,我们的认证管理器也了解了,现在正是通过流程核心AbstractAuthenticationProcessingFilter将所有认证过程串联起来
AbstractAuthenticationProcessingFilter认证流程引擎过滤器
AbstractAuthenticationProcessingFilter是各种认证流程的父类,它封装了基本认证流程中的通用环节,核心处理由子类去实现,关键源码如下:
public abstract class AbstractAuthenticationProcessingFilter extends GenericFilterBean
		implements ApplicationEventPublisherAware, MessageSourceAware {

    ......
    /** 认证管理器 */
	private AuthenticationManager authenticationManager;

    /** 认证成功后的处理器 */
	private AuthenticationSuccessHandler successHandler = new SavedRequestAwareAuthenticationSuccessHandler();

	/** 认证失败后的处理器 */
	private AuthenticationFailureHandler failureHandler = new SimpleUrlAuthenticationFailureHandler();
	......

	@Override
	public void doFilter(ServletRequest request, ServletResponse response, FilterChain chain)
			throws IOException, ServletException {
		doFilter((HttpServletRequest) request, (HttpServletResponse) response, chain);
	}

	private void doFilter(HttpServletRequest request, HttpServletResponse response, FilterChain chain)
			throws IOException, ServletException {
		if (!requiresAuthentication(request, response)) {
			chain.doFilter(request, response);
			return;
		}
		try {
			Authentication authenticationResult = attemptAuthentication(request, response);
			.....
			successfulAuthentication(request, response, chain, authenticationResult);
		}
		catch (InternalAuthenticationServiceException failed) {
			....
			unsuccessfulAuthentication(request, response, failed);
		}
		catch (AuthenticationException ex) {
			unsuccessfulAuthentication(request, response, ex);
		}
	}

	/** 判断是否需要身份认证 */
	protected boolean requiresAuthentication(HttpServletRequest request, HttpServletResponse response) {
		.....
	}

	/** 开始认证,由子类去实现 */
	public abstract Authentication attemptAuthentication(HttpServletRequest request, HttpServletResponse response)
			throws AuthenticationException, IOException, ServletException;

	/** 认证成功处理逻辑 */
	protected void successfulAuthentication(HttpServletRequest request, HttpServletResponse response, FilterChain chain,
			Authentication authResult) throws IOException, ServletException {
		SecurityContextHolder.getContext().setAuthentication(authResult);
		.....
		this.successHandler.onAuthenticationSuccess(request, response, authResult);
	}

    /** 认证失败处理逻辑 */
	protected void unsuccessfulAuthentication(HttpServletRequest request, HttpServletResponse response,
			AuthenticationException failed) throws IOException, ServletException {
		SecurityContextHolder.clearContext();
		.....
		this.failureHandler.onAuthenticationFailure(request, response, failed);
	}
	.....

}文中我只保留了关键的代码,由源码我们可以知道AbstractAuthenticationProcessingFilter过滤流程为:
- 判断当前request是否需要认证,如果不需要,则放行
- 由子类去实现认证逻辑并尝试去认证,如果认证成功则返回
Authentication - 如果认证结果成功返回
Authentication则将认证信息放入SecurityContext当中并调用AuthenticationSuccessHandler中的onAuthenticationSuccess()方法 - 如果认证抛出
InternalAuthenticationServiceException或AuthenticationException异常,则清空SecurityContextHolder上下文信息,并调用AuthenticationFailureHandler中的onAuthenticationFailure()方法
从上文中,我们知道了认证的整体流程,但是认证过程中的关键调用attemptAuthentication() 它的细节我们并不知道,本文就以它的子类UsernamePasswordAuthenticationFilter用户名密码模式来分析下它的具体流程,下面就以UsernamePasswordAuthenticationFilter举例:

上面图中,我们知道了流程,实现方式,我们再结合源码:
@Override
public Authentication attemptAuthentication(HttpServletRequest request, HttpServletResponse response)
    throws AuthenticationException {
    if (this.postOnly && !request.getMethod().equals("POST")) {
        throw new AuthenticationServiceException("Authentication method not supported: " + request.getMethod());
    }
    String username = obtainUsername(request);
    username = (username != null) ? username : "";
    username = username.trim();
    String password = obtainPassword(request);
    password = (password != null) ? password : "";
    UsernamePasswordAuthenticationToken authRequest = new UsernamePasswordAuthenticationToken(username, password);
    // Allow subclasses to set the "details" property
    setDetails(request, authRequest);
    return this.getAuthenticationManager().authenticate(authRequest);
}
由源码可知:
- 当用户提交认证信息凭证时
UsernamePasswordAuthenticationFilter中根据request信息调用attemptAuthentication()方法创建UsernamePasswordAuthenticationToken从而获得一个Authentication对象,UsernamePasswordAuthenticationToken即为Authentication的一个具体实现 - 将
Authentication传递给AuthenticationManager进行身份认证 - 认证成功,则返回
Authentication,认证失败,则参考 ProviderManager
这样,我们就把整个认证过程都串联起来了。
权限
从上文中,我们已经了解到了SpringSecurity强大的认证功能,已经强大的可拓展性,现在,我们了解下SpringSecurity的授权机制。授权的过程,你会发现与认证流程有着惊人的相似点。
在SpringSecurity的授权过程当中,同样有一个过滤链,而这个过滤链的抽象父类就是AbstractSecurityInterceptor
AbstractSecurityInterceptor权限过滤链拦截的抽象类
我们先根据源码看看AbstractSecurityInterceptor重点做了哪些事情
public abstract class AbstractSecurityInterceptor
        implements InitializingBean, ApplicationEventPublisherAware, MessageSourceAware {

    /** 校验受保护对象所需要的权限是否可被支持 */
    private void validateAttributeDefs(Collection<ConfigAttribute> attributeDefs) {
        ........
    }

    /** 在受保护对象被调用之前的操作 */
    protected InterceptorStatusToken beforeInvocation(Object object) {
       ........
    }

    /** 尝试执行授权操作 */
    private void attemptAuthorization(Object object, Collection<ConfigAttribute> attributes,
                                      Authentication authenticated) {
       .......
    }

    /** 调用结束后的相关清理工作 */
    protected void finallyInvocation(InterceptorStatusToken token) {
       ......
    }

   /** 在受保护对象被调用之后的操作 */
    protected Object afterInvocation(InterceptorStatusToken token, Object returnedObject) {
        .....
    }
}
SpringSecurity的权限主要分为方法调用前,以及方法调用后,拦截的方案分别由两个管理器管理,他们是:
- 方法调用前的: AccessDecisionManager-访问决策管理器
- 方法调用后的: AfterInvocationManager-调用后置管理器
这里额外说明一下Collection<ConfigAttribute> attributes,这里指的是受保护对象需要被访问时所需要的权限集合,这个属性在后续操作中多次被用到。
对于AbstractSecurityInterceptor抽象实现,SpringSecurity对于此抽象的实现一共有3个:
- FilterSecurityInterceptor 过滤器拦截方式-通过实现Filter的方式进行验证
- MethodSecurityInterceptor 方法拦截-通过实现Spring方法拦截的接口MethodInterceptor进行验证
- AspectJMethodSecurityInterceptor 切面拦截,继承MethodSecurityInterceptor,使其通过aop的方式进行拓展实现
FilterSecurityInterceptor过滤器权限拦截
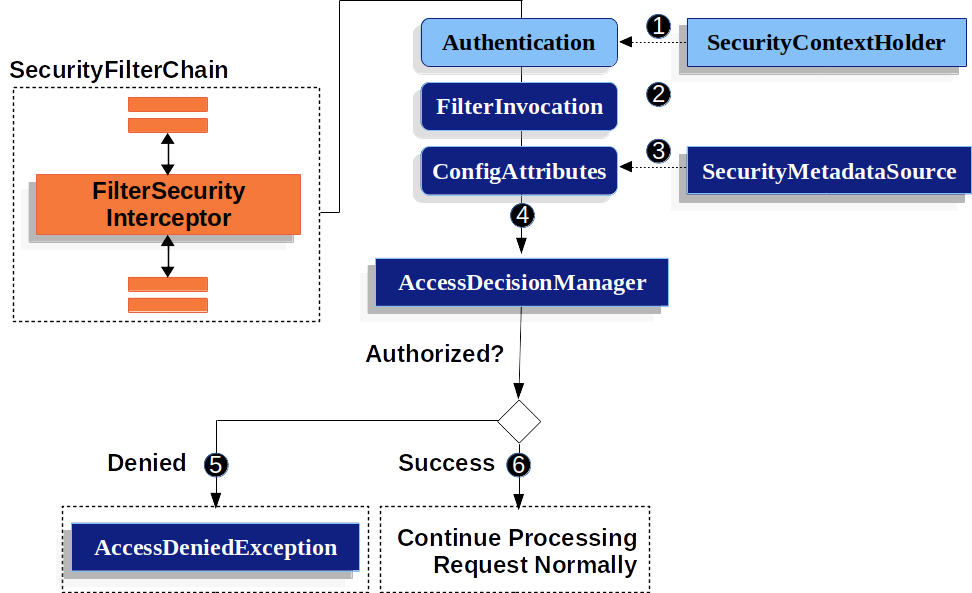
我们根据官方提供的图,看看FilterSecurityInterceptor做了哪些事情

现在我们来看看验证权限的流程,我们就按照FilterSecurityIntercepter的流程走:
FilterSecurityInterceptor通过SecurityContextHolder得到认证的Authentication信息FilterSecurityInterceptor在doFilter()方法中,根据HttpServletRequest,HttpServletResponse,FilterChain创建FilterInvocation对象- 通过执行父类的
beforeInvocation()方法从SecurityMetadataSource中获取被保护对象所需要的权限 - 接着将
FilterInvocation,Authentication跟ConfigAttributes三个参数调用attemptAuthorization()方法,交给AccessDecisionManager去执行。 - 如果授权失败,则抛出
AccessDeiedException异常 - 如果授权成功,则正常处理request请求
由上述流程可知,主要判断是否授权成功与否的决策器是AccessDecisionManager,受保护对象的所需权限,由SecurityMetadataSource整理并返回,而认证的权限来源则我们需要先再回顾一下GrantedAuthority,它代表着当前用户所拥有的权限列表,它是用AuthenticationManager认证后,设置到Authentication里面的,它的方法在源码中只有一个,如下
public interface GrantedAuthority extends Serializable {
	String getAuthority();
}
它的返回值为String类型,意味着你必须提供一个精准的字符串作为权限信息,使其能够被权限的管理器AccessDecisionManager 精准的判定。
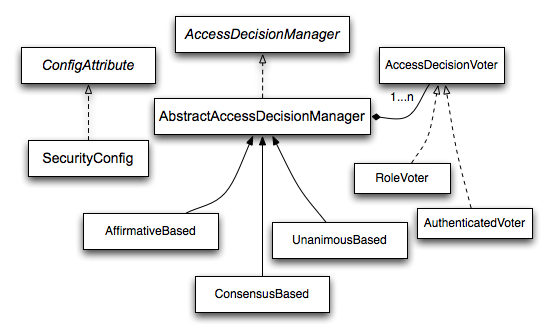
SpringSecurity对于AccessDecisionManager实现,使用了投票机制的方式,如图所示:

整体思路就是,由实现AccessDecisionVoter的各个投票器进行投票,由AccessDecisionManager对投票结果进行处理,判定用户是否授权通过。现在我们对于AccessDecisionManager跟AccessDecisionVoter进行详细介绍
AccessDecisionManager访问决策管理器
AccessDecisionManager是由AbstractSecurityInterceptor(这是验权过程当中的一个过滤链的父类抽象,后文会详细介绍) 调用的,它负责鉴定用户是否有访问对应资源(方法或URL)的权限,源码如下。
public interface AccessDecisionManager {
   /**
     * 通过传递的参数来决定用户是否有访问对应受保护对象的权限
     *
     * @param authentication 当前正在请求受包含对象的Authentication
     * @param object 受保护对象,其可以是一个MethodInvocation。
     * @param configAttributes 与正在请求的受保护对象相关联的配置属性
     */
	void decide(Authentication authentication, Object object, Collection<ConfigAttribute> configAttributes)
			throws AccessDeniedException, InsufficientAuthenticationException;

	boolean supports(ConfigAttribute attribute);

	boolean supports(Class<?> clazz);

}- decide()方法有三个参数,已在注释当中对其进行说明,作用就是,
authentication的权限信息,是否符合object受保护对象要求的configAttributes,简单的例子就是访问删除用户方法需要admin权限,此时用户张三需要访问这个方法,张三的authentication里的权限信息,是否存在删除用户方法所需要的admin角色。 - support方法有两个,第一个则代表的是当前的
AccessDecisionManager是否支持并且能够处理对应的configAttributes,第二个则是受保护的对象类型是否支持
由图可以,Spring官方提供了三种不同的决策器,分别是AffirmativeBased、ConsensusBased和UnanimousBased,统一继承自抽象父类AccessDecisionManager,现在我们看一下三种决策器的源码,去分析出他们是如何决策的。
投票决策器-AffirmativeBased
public class AffirmativeBased extends AbstractAccessDecisionManager {
	public AffirmativeBased(List<AccessDecisionVoter<?>> decisionVoters) {
		super(decisionVoters);
	}
	@Override
	@SuppressWarnings({ "rawtypes", "unchecked" })
	public void decide(Authentication authentication, Object object, Collection<ConfigAttribute> configAttributes)
			throws AccessDeniedException {
		int deny = 0;
		for (AccessDecisionVoter voter : getDecisionVoters()) {
			int result = voter.vote(authentication, object, configAttributes);
			switch (result) {
			case AccessDecisionVoter.ACCESS_GRANTED:
				return;
			case AccessDecisionVoter.ACCESS_DENIED:
				deny++;
				break;
			default:
				break;
			}
		}
		if (deny > 0) {
			throw new AccessDeniedException(
					this.messages.getMessage("AbstractAccessDecisionManager.accessDenied", "Access is denied"));
		}
		// To get this far, every AccessDecisionVoter abstained
		checkAllowIfAllAbstainDecisions();
	}
}通过源码,我们可以看到,只有当deny > 0的时候,才会抛出异常,但是大于0的情况只会出现在第二个case的情况,由此我们可以得出的结论是:
- 如果有一票是赞成票,则授权通过
- 如果没有一票是赞成票,但是有投反对票的,则抛出
AccessDeniedException异常,授权不通过 - 如果没有赞成票,也没有反对票,则授权通过
投票决策器-ConsensusBased
public class ConsensusBased extends AbstractAccessDecisionManager {

	private boolean allowIfEqualGrantedDeniedDecisions = true;

	public ConsensusBased(List<AccessDecisionVoter<?>> decisionVoters) {
		super(decisionVoters);
	}

	@Override
	@SuppressWarnings({ "rawtypes", "unchecked" })
	public void decide(Authentication authentication, Object object, Collection<ConfigAttribute> configAttributes)
			throws AccessDeniedException {
		int grant = 0;
		int deny = 0;
		for (AccessDecisionVoter voter : getDecisionVoters()) {
			int result = voter.vote(authentication, object, configAttributes);
			switch (result) {
			case AccessDecisionVoter.ACCESS_GRANTED:
				grant++;
				break;
			case AccessDecisionVoter.ACCESS_DENIED:
				deny++;
				break;
			default:
				break;
			}
		}
		if (grant > deny) {
			return;
		}
		if (deny > grant) {
			throw new AccessDeniedException(
					this.messages.getMessage("AbstractAccessDecisionManager.accessDenied", "Access is denied"));
		}
		if ((grant == deny) && (grant != 0)) {
			if (this.allowIfEqualGrantedDeniedDecisions) {
				return;
			}
			throw new AccessDeniedException(
					this.messages.getMessage("AbstractAccessDecisionManager.accessDenied", "Access is denied"));
		}
		// To get this far, every AccessDecisionVoter abstained
		checkAllowIfAllAbstainDecisions();
	}

	public boolean isAllowIfEqualGrantedDeniedDecisions() {
		return this.allowIfEqualGrantedDeniedDecisions;
	}

	public void setAllowIfEqualGrantedDeniedDecisions(boolean allowIfEqualGrantedDeniedDecisions) {
		this.allowIfEqualGrantedDeniedDecisions = allowIfEqualGrantedDeniedDecisions;
}废话不多说,直接看哪个地方抛出了AccessDeniedException,通过源码我们可以看到deny为反对票,grant为赞成票,当deny > grant的时候会驳回,以及grant等于deny并且grant不为0的情况下,根据系统设置判定是否驳回。由此我们可以得出结论:
- 如果赞成票多于反对票,则授权通过
- 如果反对票多于赞成票,则授权失败
- 如果赞成票等于反对票,并且赞成票不等于0,视系统设置而定,如果参数
allowIfEqualGrantedDeniedDecisions为true则授权通过,反之则授权失败,allowIfEqualGrantedDeniedDecisions默认为true - 如果全部弃票,则视父类抽象
AbstractAccessDecisionManager中的allowIfAllAbstainDecisions值来定,如果参数allowIfAllAbstainDecisions为true则授权通过,反之则授权失败,allowIfEqualGrantedDeniedDecisions默认为false
投票决策器-UnanimousBased
public class UnanimousBased extends AbstractAccessDecisionManager {

	public UnanimousBased(List<AccessDecisionVoter<?>> decisionVoters) {
		super(decisionVoters);
	}

	@Override
	@SuppressWarnings({ "rawtypes", "unchecked" })
	public void decide(Authentication authentication, Object object, Collection<ConfigAttribute> attributes)
			throws AccessDeniedException {
		int grant = 0;
		List<ConfigAttribute> singleAttributeList = new ArrayList<>(1);
		singleAttributeList.add(null);
		for (ConfigAttribute attribute : attributes) {
			singleAttributeList.set(0, attribute);
			for (AccessDecisionVoter voter : getDecisionVoters()) {
				int result = voter.vote(authentication, object, singleAttributeList);
				switch (result) {
				case AccessDecisionVoter.ACCESS_GRANTED:
					grant++;
					break;
				case AccessDecisionVoter.ACCESS_DENIED:
					throw new AccessDeniedException(
							this.messages.getMessage("AbstractAccessDecisionManager.accessDenied", "Access is denied"));
				default:
					break;
				}
			}
		}
		// To get this far, there were no deny votes
		if (grant > 0) {
			return;
		}
		// To get this far, every AccessDecisionVoter abstained
		checkAllowIfAllAbstainDecisions();
	}

}根据源码,我们可知道,UnanimousBased是根据属性以及其他投票器的投票结果,来确定是否通过的,而源码中的驳回只有在第二个case种出现,它是在其他投票器中被抉择为fasle的,而且UnanimousBased不同于其他两个投票器,其他两个投票器都是对所有属性一次性整理得出结论,而UnanimousBased是对属性一个个进行抉择,所以在全部验证属性整理可能通过时,逐个判断就不一定了。由此我们可以得出以下结论:
- 当所有属性在其他决策器没有反对票,但是有赞成票时,则授权通过
- 当其他决策器对某一属性出现反对票时,则授权失败
- 当全部弃票时,则视父类抽象
AbstractAccessDecisionManager中的allowIfAllAbstainDecisions值来定,如果参数allowIfAllAbstainDecisions为true则授权通过,反之则授权失败,allowIfEqualGrantedDeniedDecisions默认为false
投票方式的实现-AccessDecisionVoter
决策器介绍完了,那投票器是如何投票的呢? 这种方式就是对所有的AccessDecisionVoter的实现的Voter,轮询进行决策,最终由AccessDecisionManager得出投票结果,判定是否有权限访问受保护的资源。我们先来看下AccessDecisionVoter接口都需要我们做什么
public interface AccessDecisionVoter<S> {

    /** 同意 */
	int ACCESS_GRANTED = 1;

    /** 弃权 */
	int ACCESS_ABSTAIN = 0;

	/** 驳回 */
	int ACCESS_DENIED = -1;


	boolean supports(ConfigAttribute attribute);

	boolean supports(Class<?> clazz);

	int vote(Authentication authentication, S object, Collection<ConfigAttribute> attributes);

}
他与决策器的方法比较相似
- vote()方法依然后有三个参数,authentication
的权限信息,是否符合object受保护对象要求的configAttributes - support方法依然有两个,第一个则代表的是当前的
AccessDecisionVoter是否支持并且能够处理对应的configAttributes,第二个则是受保护的对象类型是否支持
不同的是 vote()方法,有了返回值,他的返回类型为int,而返回的数值则为上面已经备注了的ACCESS_GRANTED(同意),ACCESS_ABSTAIN(弃权)以及ACCESS_DENIED(驳回)。
SpringSecurity官方内置的投票器有两个,分别为RoleVoter与AuthenticatedVoter
RoleVoter角色投票器
用法如其名,它会将传入的ConfigAttribute认为是一个角色的名称,它的支持标准在源码中如下
private String rolePrefix = "ROLE_";

@Override
public boolean supports(ConfigAttribute attribute) {
    return (attribute.getAttribute() != null) && attribute.getAttribute().startsWith(getRolePrefix());
}如果ConfigAttribute不为空,并且为指定前缀,则使用RoleVoter进行投票,源码中的默认前缀为ROLE_,开发过程中,你可通过自定义前缀
我们再看一下它的投票代码
@Override
public int vote(Authentication authentication, Object object, Collection<ConfigAttribute> attributes) {
    if (authentication == null) {
        return ACCESS_DENIED;
    }
    int result = ACCESS_ABSTAIN;
    Collection<? extends GrantedAuthority> authorities = extractAuthorities(authentication);
    for (ConfigAttribute attribute : attributes) {
        if (this.supports(attribute)) {
            result = ACCESS_DENIED;
            // Attempt to find a matching granted authority
            for (GrantedAuthority authority : authorities) {
                if (attribute.getAttribute().equals(authority.getAuthority())) {
                    return ACCESS_GRANTED;
                }
            }
        }
    }
    return result;
}
根据源代码,我们可以得出如下结论:
- 如果认证信息为空,则投反对票
- 如果权限所需要的角色在认证的角色中存在,则投赞成票
- 如果权限中的角色存在已指定前缀开头(如
ROLE_),但是没有一个角色能匹配上所需角色,则投反对票 - 如果权限中的角色没有已指定前缀开头(如
ROLE),则投弃权票
AuthenticatedVoter认证投票器
它是对于认证来源来判定的投票器,源代码如下
public static final String IS_AUTHENTICATED_FULLY = "IS_AUTHENTICATED_FULLY";

public static final String IS_AUTHENTICATED_REMEMBERED = "IS_AUTHENTICATED_REMEMBERED";

public static final String IS_AUTHENTICATED_ANONYMOUSLY = "IS_AUTHENTICATED_ANONYMOUSLY";

@Override
public boolean supports(ConfigAttribute attribute) {
    return (attribute.getAttribute() != null) && (IS_AUTHENTICATED_FULLY.equals(attribute.getAttribute())
                                                  || IS_AUTHENTICATED_REMEMBERED.equals(attribute.getAttribute())
                                                  || IS_AUTHENTICATED_ANONYMOUSLY.equals(attribute.getAttribute()));
}由代码可知,有且仅支持ConfigAttribute是IS_AUTHENTICATED_FULLY,IS_AUTHENTICATED_REMEMBERED,IS_AUTHENTICATED_ANONYMOUSLY这三种情况
- IS_AUTHENTICATED_FULLY: 完全的权限认证,这种方式往往是通过正常登录(用户名密码登录,Token等)来的
- IS_AUTHENTICATED_REMEMBERED: 记住我的方式,这种方式是通过记住我功能实现的认证
- IS_AUTHENTICATED_ANONYMOUSLY: 匿名方式,既未认证的用户。
我们再来看一下它的vote投票方法:
@Override
public int vote(Authentication authentication, Object object, Collection<ConfigAttribute> attributes) {
    int result = ACCESS_ABSTAIN;
    for (ConfigAttribute attribute : attributes) {
        if (this.supports(attribute)) {
            result = ACCESS_DENIED;
            if (IS_AUTHENTICATED_FULLY.equals(attribute.getAttribute())) {
                if (isFullyAuthenticated(authentication)) {
                    return ACCESS_GRANTED;
                }
            }
            if (IS_AUTHENTICATED_REMEMBERED.equals(attribute.getAttribute())) {
                if (this.authenticationTrustResolver.isRememberMe(authentication)
                    || isFullyAuthenticated(authentication)) {
                    return ACCESS_GRANTED;
                }
            }
            if (IS_AUTHENTICATED_ANONYMOUSLY.equals(attribute.getAttribute())) {
                if (this.authenticationTrustResolver.isAnonymous(authentication)
                    || isFullyAuthenticated(authentication)
                    || this.authenticationTrustResolver.isRememberMe(authentication)) {
                    return ACCESS_GRANTED;
                }
            }
        }
    }
    return result;
}通过源代码解析,我们可以知道,投票器默认是弃权票,当所需属性是上述三种时,开始进行判断,顺便一提源码中对上述三种情况的判定方法分别是isFullyAuthenticated(authentication),isRememberMe(authentication),isAnonymous(authentication) 其中isRememberMe(authentication)与isAnonymous(authentication)调用的是AuthenticationTrustResolver中的方法,判定方式是通过判断authentication的类型是不是RememberMeAuthenticationToken.class或者AnonymousAuthenticationToken.class,而isFullyAuthenticated(authentication)则是判断authentication是不是isAnonymous(authentication) 跟isRememberMe(authentication),如果两个均不是则是完全认证。根据源代码的流程,我们可以得出以下结论:
- 当受保护资源不属于上述三证类型判断时,则投弃权票
- 当受保护资源为完全认证,认证权限类型是完全认证时则投赞成票,否则投反对票
- 当受保护资源为记住我时,认证权限是完全认证或者记住我时,则投赞成票,否则投反对票
- 当受保护资源为匿名认证时,则认证权限只要是三种类型的任意一种,则投赞成票,否则投反对票
小结
综上,我们知道了SpringSecurity默认的两种投票器,当然,如果这两种投票器无法满足的你需求,你完全可以自定义投票器加入到其中,根据自己的业务规则制定投票结果。
AfterInvocationManager调用后置管理器
如果业务中需要对调用后的数据校验或统一操作,你可以去使用它,他提供了一个很方便的钩子方法,你可以根据实际需求去过滤修改返回的数据,通常用于数据权限。
后置管理器跟SpringSecurity其他解决方案的思想基本一致,由一个AfterInvocationManager作为顶层管理器设计类,源码如下:
public interface AfterInvocationManager {

	Object decide(Authentication authentication, Object object, Collection<ConfigAttribute> attributes,
			Object returnedObject) throws AccessDeniedException;

	boolean supports(ConfigAttribute attribute);

	boolean supports(Class<?> clazz);

}调用后置管理器跟AccessDecisionManager访问决策管理器比较像,区别就在于访问决策器无返回值,它返回一个处理后的返回对象,相应的传入参数多了一个返回对象,SpringSecurity对于它的唯一实现是AfterInvocationProviderManager类,它管理者所有AfterInvocationProvider返回处理类,SpringSecurity对于AfterInvocationProvider的默认实现为PostInvocationAdviceProvider,具体实现的操作就是根据我们自己的配置,来执行,如果不能满足,我们可自行实现AfterInvocationProvider。
就此,我们把SpringSecurity的整个认证与鉴权的代码与原理梳理完了,本文主要讲解原理,具体实际应用,我会单独再写一篇博文,希望本文对大家有所帮助跟启发,谢谢大家!


